Importance of Safety First Car Seat
A Safety First car seat is crucial for protecting children in vehicles, reducing injury risk by up to 70% in crashes. Proper installation ensures optimal safety, preventing fatal outcomes.
1.1. Why Safety First Car Seats Are Essential
Safety First car seats are vital for protecting children during car travel. They reduce the risk of fatal injury by up to 70% in crashes. Proper installation ensures the seat absorbs impact forces, keeping the child secure. Rear-facing seats are especially crucial for infants, as they support the head and neck. The back seat is the safest location, minimizing injury risks. Following the instruction manual guarantees correct setup, ensuring maximum protection. These seats are designed to align with vehicle safety features, providing a secure environment for children during travel.
1.2. Benefits of Using a Safety First Car Seat
Using a Safety First car seat offers numerous benefits, ensuring your child’s safety and providing peace of mind. It reduces the risk of fatal injury by up to 70% in crashes. The seat’s design distributes crash forces across the seat, protecting your child’s delicate body. Proper installation, as per the manual, secures the seat firmly, preventing movement during sudden stops. Additionally, Safety First car seats are designed to grow with your child, offering versatility and long-term use. They also meet federal safety standards, ensuring reliability and effectiveness in various collision scenarios.
1.3. Consequences of Improper Car Seat Installation
Improper installation of a Safety First car seat can lead to severe consequences, including increased risk of injury or ejection during a crash. A loosely secured seat may fail to protect your child, potentially causing fatal outcomes. Additionally, incorrect positioning or misuse of harness straps can leave your child vulnerable to harm. It is critical to follow the manufacturer’s instructions precisely to ensure the car seat functions as intended. Neglecting proper installation can compromise your child’s safety, emphasizing the importance of careful adherence to guidelines and regular checks to maintain optimal protection.

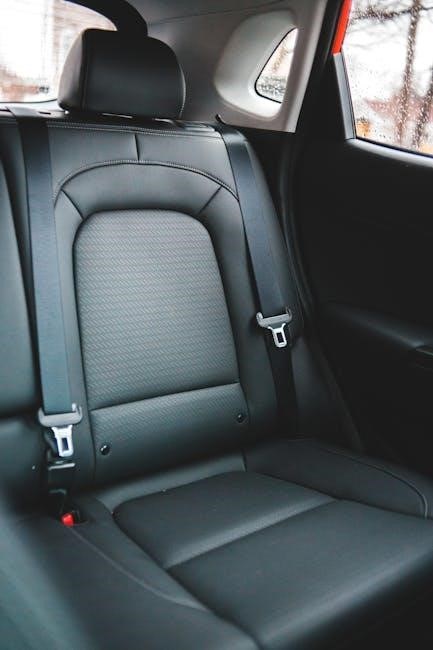
Understanding Safety First Car Seat Components
The Safety First car seat features a sturdy base, adjustable harness, and recline mechanism, ensuring stability, proper positioning, and secure fit for your child’s safety and comfort.
2.1. Key Parts of the Safety First Car Seat
The Safety First car seat includes a robust base, adjustable harness straps, recline mechanism, and tether straps. The base ensures stability, while the harness secures the child snugly. The recline feature adjusts for optimal positioning, and tether straps enhance anchorage. These components work together to provide a safe and comfortable environment for your child during travel, adhering to safety standards and manufacturer guidelines for proper installation and use.
2.2. Harness and Strap System
The harness and strap system is a critical feature of the Safety First car seat, designed to securely hold your child in place. The straps are padded for comfort and adjust to fit your child snugly. The harness distributes the force of impact across the strongest parts of the body, reducing injury risk. Proper tightening is essential to ensure safety. Always check that the straps are snug and the buckle is securely fastened. Regularly inspect the straps for wear or damage, and follow the manufacturer’s instructions for adjustments and maintenance to ensure optimal protection for your child during travel.
2.3. Base and Recline Adjustments
Proper base and recline adjustments are vital for ensuring the car seat fits securely in your vehicle and provides optimal support for your child. The base should be placed firmly on the vehicle seat, with the recline angle adjusted to match the manufacturer’s guidelines. Use the recline adjustment feature to achieve the correct position, ensuring the seat is level and stable. Check the built-in level indicator to confirm the angle is correct. Secure the base tightly using the vehicle seat belt or LATCH system, and ensure the tether strap is properly attached for added stability. Regularly verify these adjustments for safety.

Preparing for Installation
Read the manual thoroughly, check the car seat’s expiry date, and ensure compatibility with your vehicle to guarantee a safe and proper installation process for your child.
3.1. Reading the Instruction Manual
Reading the instruction manual is critical for proper car seat installation. It provides model-specific guidance, ensuring safety and compliance with manufacturer standards. The manual outlines installation steps, safety features, and weight/height limits. Understanding these details prevents errors and enhances protection. Always verify compatibility with your vehicle and refer to diagrams for clarity. Ignoring manual instructions can lead to improper installation, risking your child’s safety. Take time to review warnings and recommendations thoroughly before proceeding. This step ensures a secure and correct setup, minimizing potential hazards during travel.
3.2. Checking the Expiry Date of the Car Seat
Always check the expiry date of your Safety First car seat, as using an expired seat can compromise safety. Manufacturers set expiry dates due to material degradation over time, which may affect performance in crashes. Locate the expiry date on the seat’s label or in the instruction manual. Using an expired car seat can void warranties and fail safety standards. Ensure your child’s seat is within its valid period before installation. This step is crucial for maintaining reliability and ensuring your child is protected during travel. Never overlook this detail, as it directly impacts safety and compliance with regulations.
3.3. Ensuring Compatibility with Your Vehicle
Before installing a Safety First car seat, ensure it is compatible with your vehicle. Check the car seat manual for specific vehicle make and model recommendations. Use the LATCH system if available, or the vehicle’s seat belt, following manufacturer guidelines. Test the car seat fit by securing it firmly and checking for proper alignment. If unsure, consult both the car seat and vehicle manuals for clarity. compatibility ensures a snug, stable installation, enhancing safety. Never assume universal fit; verify compatibility to avoid unsafe conditions and ensure optimal protection for your child during travel.
Installation Methods
Safety First car seat installation methods include rear-facing, forward-facing, LATCH, and seat belt options. Always follow vehicle and car seat manuals for proper and secure installation.
4.1. Rear-Facing Installation
For rear-facing installation, place the Safety First car seat in the back seat, ensuring it is snug and secure. Follow the vehicle and car seat manuals to tighten the base using LATCH or a seat belt. Check the recline angle to match the manufacturer’s guidelines for rear-facing mode. Ensure the harness straps are snug and at or below the child’s shoulders. Always verify that the base is tightly secured and cannot move more than one inch side to side or front to back. Proper installation minimizes risks and maximizes protection for your child in the event of sudden stops or collisions.
4.2. Forward-Facing Installation
For forward-facing installation, position the Safety First car seat in the back seat, ensuring proper alignment with the vehicle’s seat. Secure the base using LATCH or a seat belt, tightening until it cannot move more than one inch side to side or front to back. Adjust the harness height to be at or above the child’s shoulders and ensure the straps are snug. Use the top tether to anchor the seat for added stability. Always refer to the car seat manual for specific guidance, as improper installation can compromise safety. Ensure the child’s head is at least two inches below the seat’s top for optimal protection. Follow manufacturer instructions to confirm correct installation and adjust as needed for your child’s growth and safety.
4.3. Using LATCH vs. Seat Belt
When installing a Safety First car seat, choose between LATCH (Lower Anchors and Tethers for Children) or a seat belt. LATCH provides a secure and straightforward installation, while seat belts are a reliable alternative. For LATCH, attach the lower anchors to the vehicle’s designated points and tighten the straps until the base is firm. If using a seat belt, thread it through the base’s belt path and tighten, ensuring no slack. Always use the top tether for forward-facing seats to enhance stability. Check the car seat manual for weight limits, as LATCH may have restrictions. Proper use ensures maximum safety and protection for your child.
4.4. Securing the Base with Tether Straps
Securing the base with tether straps is a critical step for added stability. Locate the tether anchor in your vehicle, typically behind or on the back of the seat. Attach the tether strap from the car seat base to this anchor, ensuring it is snug and properly aligned. Tighten the strap until there is no slack, then check the base for movement. A firm tug should confirm it is securely fastened. This step is especially important for forward-facing installations, as it prevents excessive movement during sudden stops or crashes. Always refer to your vehicle’s manual to find the correct tether anchor location.
Adjusting for Maximum Safety
Proper adjustments ensure optimal protection. Check the recline angle, tighten harness straps, and verify seat belt fit. These steps ensure a snug, protective fit for your child.
5.1. Recline Angle Adjustment
Adjusting the recline angle ensures the car seat fits your child securely. Follow the manufacturer’s instructions to achieve the correct angle, typically indicated by a level line. For rear-facing seats, the angle should be more upright, while forward-facing seats may require a slightly different adjustment. Ensure the seat is not too upright or too reclined, as this can compromise safety. Proper adjustment distributes the force of impact evenly, protecting your child’s head and neck. Always refer to the user guide for specific angle recommendations based on your child’s age and weight.
5.2. Tightening the Harness Straps
Tightening the harness straps is essential for your child’s safety. Ensure the straps are snug, with no slack, and the chest clip is at armpit level. Pull the straps firmly to eliminate any looseness, making sure they pass the “pinch test”—you shouldn’t be able to pinch excess material. If the straps are too loose, your child could move during a sudden stop or crash, increasing injury risk. Always follow the manufacturer’s instructions for tightening, as improper adjustment can compromise protection. Regularly check the harness fit as your child grows to maintain optimal safety.
5.3. Ensuring Proper Seat Belt Fit
Ensuring a proper seat belt fit is critical for your child’s safety. The shoulder strap should rest across the chest, not the neck, and the lap belt should lie flat across the hips. Avoid any twists or slack in the belt, as this can compromise protection. Regularly check the fit as your child grows, adjusting the harness height and seat belt position as needed. A snug, correctly positioned seat belt minimizes movement during travel, reducing the risk of injury. Always refer to your car seat’s manual for specific guidance on achieving the best fit for your child.
Securing the Child
Place the child in the seat, ensuring they sit upright with their back against the seat. Adjust the harness to fit snugly, avoiding bulky clothing, and ensure straps are not twisted for maximum safety and comfort.
6.1; Placing the Child in the Seat
When placing the child in the Safety First car seat, ensure they sit upright with their back against the seat and knees bent naturally. The harness straps should lie flat and not be twisted. Avoid bulky clothing, as it can interfere with the harness fit. Position the child so their ears are below the top of the car seat for proper alignment. Always follow the manufacturer’s guidelines for height and weight limits to ensure a secure fit. Regularly check the fit to accommodate growth and maintain safety and comfort during travel.
6.2. Adjusting the Harness Height
Adjust the harness height to ensure proper fit for your child. For rear-facing, the straps should be at or below the child’s shoulders. When forward-facing, they should be at or above. Periodically check the harness height as your child grows. Ensure the straps are snug and free from twists. Tighten the harness until it passes the “pinch test”—no excess material should bunch at the shoulder. Regular adjustments maintain safety and comfort, preventing straps from being too loose or restrictive. Always refer to the Safety First car seat manual for specific height adjustment guidelines tailored to your model.
6.3. Buckling Up Safely
Buckling your child safely ensures their protection in a vehicle. Always fasten the harness straps snugly, passing the “pinch test”—no excess material should bunch up. Ensure straps are free from twists and properly positioned. For rear-facing seats, straps should be at or below shoulder level; forward-facing, at or above. Secure the chest clip at armpit level to prevent ejection. Double-check the buckle for a secure click. Never leave loose ends or allow slack, as this can compromise safety in sudden stops or crashes. Always follow the Safety First car seat manual for specific buckling instructions tailored to your model.

Common Mistakes to Avoid
Common mistakes include loose harness straps, incorrect recline angles, and improper use of tether straps. Ensure straps are snug, angles are correct, and tethers are securely fastened.
7.1. Loose Harness Straps
Loose harness straps are a critical mistake, as they can lead to injury or ejection during a crash. Always ensure straps are snug, passing the pinch test. Incorrect positioning, such as placing straps too low or using bulky clothing, can cause looseness. Regularly check and tighten straps, especially as children grow or seasons change. Never assume straps are secure without verification. Properly securing the harness is vital for maximum protection. Neglecting this step can compromise your child’s safety, increasing the risk of harm. Always follow the manufacturer’s guidelines for tightening and adjusting straps to ensure optimal safety. Stay vigilant to prevent this common error;
7.2. Incorrect Recline Angle
An incorrect recline angle can compromise your child’s safety, as it may lead to their head moving too far forward or backward during a crash. Always refer to the instruction manual for the recommended recline position, which varies by car seat model and installation method. A recline that’s too upright or too laid-back can increase injury risk. Use the built-in level indicator or a bubble level to ensure accuracy; Adjust the recline mechanism carefully, following the manufacturer’s guidelines. Failure to set the correct angle can result in reduced protection, making it essential to double-check this step during installation. Proper alignment is critical for optimal safety.
7.3. Improper Use of Tether Straps
Improper use of tether straps is a critical mistake that can compromise your child’s safety. Tether straps are designed to secure the car seat firmly to the vehicle, preventing excessive movement during sudden stops or crashes. If the straps are not tightened properly or are attached incorrectly, the car seat may shift, increasing the risk of injury. Always ensure the tether strap is routed correctly and tightened firmly according to the instruction manual. Failure to do so can lead to poor protection, even if the rest of the installation appears correct. Proper tether strap use is essential for maximizing crash protection and ensuring your child’s safety.

Maintenance and Care
Regularly clean the car seat, replace expired or damaged parts, and inspect it thoroughly. Follow the manufacturer’s guide for maintenance to ensure long-term safety and durability.
8.1. Cleaning the Car Seat
Cleaning a Safety First car seat requires care to maintain its safety and durability. Always refer to the instruction manual for specific guidance. Use a mild detergent and warm water to spot clean stains on the fabric. Avoid using bleach or harsh chemicals, as they may damage the materials. Gently scrub the affected areas with a soft cloth and allow them to air dry. Regularly wipe down plastic and metal parts with a damp cloth. Never submerge the car seat in water or use abrasive cleaners, as this could compromise its structural integrity. Ensure all parts are dry before reassembling the seat. If the harness or straps are soiled, clean them carefully to maintain their strength. Remember, cleaning should never compromise the car seat’s ability to protect your child in the event of an accident. If a part is severely damaged, replace it immediately. Regular maintenance ensures the car seat remains safe and functional for your child. Always prioritize your child’s safety by following the manufacturer’s cleaning recommendations. This ensures the car seat continues to meet safety standards and provides reliable protection. By keeping the car seat clean and well-maintained, you extend its lifespan and ensure it performs optimally in all situations. Regular inspections and appropriate cleaning practices are essential for maintaining the integrity of the car seat. If you’re unsure about any cleaning method, consult the user guide or contact the manufacturer for assistance. Proper care ensures your child’s car seat remains a reliable and safe option for years to come.
8.2. Replacing Expired or Damaged Parts
Regularly inspect your Safety First car seat for expired or damaged parts, as these can compromise safety. Check the expiry date on the seat or in the instruction manual. If a part is damaged, such as a cracked buckle or frayed harness, replace it immediately. Use only manufacturer-approved replacement parts to ensure compliance with safety standards. Contact the manufacturer or refer to the user guide for guidance on purchasing and installing new components. Never use a car seat with expired or damaged parts, as this could fail to protect your child in an accident. Prompt replacement ensures optimal safety and reliability. Always prioritize your child’s protection by maintaining the car seat in pristine condition, adhering to the manufacturer’s recommendations for inspections and replacements. This ensures the car seat continues to meet safety standards and provides reliable protection. By addressing expired or damaged parts promptly, you safeguard your child’s well-being on the road. Regular checks and timely replacements are essential for maintaining the car seat’s effectiveness. If unsure about any part’s condition, err on the side of caution and replace it. Your child’s safety depends on a properly functioning car seat. Always follow the manufacturer’s guidelines for replacements to ensure your child’s protection remains uncompromised. This proactive approach guarantees the car seat remains a trusted and reliable safety device for years to come.
8.3. Regular Inspection Schedule
Regular inspections are vital to ensure your Safety First car seat remains safe and functional. Schedule monthly checks to verify all parts are secure and undamaged. Examine the expiry date on the seat, as indicated in the instruction manual. Inspect the harness, straps, and base for signs of wear or frayed material. Ensure the recline mechanism operates smoothly and the tether straps are tightly secured. Refer to the user guide for specific inspection guidelines tailored to your model. Regular checks help identify potential issues early, ensuring your child’s continued safety while traveling.

Troubleshooting Common Issues
Address common problems like difficulty securing the base or harness straps not tightening by consulting the instruction manual. Resetting the system or contacting customer support can resolve most issues.
9.1. Difficulty Securing the Base
If you’re struggling to secure the base, ensure the vehicle’s seat belt or LATCH connectors are properly aligned and tightened. Check for any obstructions or twists in the straps. Tighten the base firmly against the vehicle seat, ensuring no movement. If issues persist, consult the instruction manual or contact customer support for assistance. A correctly secured base is essential for your child’s safety, so don’t hesitate to seek help if problems arise.

9.2. Harness Straps Not Tightening
If the harness straps on your Safety First car seat aren’t tightening properly, check for any twists or tangles in the straps. Ensure they are routed correctly through the seat and chest clip. Pull the straps firmly to remove slack, then tighten the harness adjuster. If issues persist, consult the instruction manual for guidance. Properly tightened straps are critical for your child’s safety, so take the time to ensure a snug and secure fit. If the problem continues, contact the manufacturer for support.
9.3. Recline Mechanism Not Working
If the recline mechanism on your Safety First car seat isn’t functioning, check for obstructions or debris that may be blocking the movement. Ensure the seat is on a flat surface and the base is securely installed. Refer to the instruction manual for guidance on adjusting the recline angle properly. If the issue persists, try gently rocking the seat back and forth while adjusting the recline. If it still doesn’t work, contact the manufacturer’s customer support for assistance. Proper recline adjustment is essential for your child’s comfort and safety during travel;
Additional Safety Tips
Always avoid aftermarket accessories and monitor your child during travel. Ensure the car seat is within weight and height limits for optimal safety and performance.
10.1. Avoiding aftermarket Accessories
10.1. Avoiding Aftermarket Accessories
Never use aftermarket accessories not approved by the manufacturer, as they can compromise the car seat’s safety features. Stick to the original parts provided to ensure compliance with safety standards and maintain the integrity of the seat’s design. Unauthorized additions may void the warranty or even lead to safety hazards. Always refer to the user guide for approved accessories and follow the manufacturer’s recommendations to keep your child safe and secure during travel.
10.2. Noting Weight and Height Limits
Always adhere to the weight and height limits specified in your Safety First car seat’s manual. These limits ensure the seat provides proper support and protection for your child. Exceeding these limits can result in a poor fit, reducing the seat’s effectiveness in a crash. Check the manual for precise weight and height restrictions and adjust the seat as your child grows. Ignoring these guidelines can compromise safety, so regular checks are essential. Proper fit ensures optimal protection, making it a critical aspect of car seat safety. Follow the manufacturer’s guidelines to keep your child secure and safe during travel.
10.3. Monitoring the Child During Travel
Monitoring your child during travel is essential for their safety and comfort. Regularly check that the harness straps remain snug and the child stays properly positioned. Ensure the car seat is secure and adjust as needed to prevent shifting. Keep your child occupied with toys or books to minimize restlessness. Avoid distractions while driving and maintain communication with your child to ensure they remain calm. Monitoring helps prevent potential hazards, such as loose straps or improper positioning. Stay attentive to your child’s needs and adjust the car seat if necessary to ensure safety throughout the journey.
Proper installation and adherence to Safety First car seat guidelines ensure optimal protection for your child. Regular checks and following manufacturer instructions are vital for long-term safety.
11.1. Final Checks Before Driving
Before driving, ensure the car seat is securely installed and your child is properly buckled. Verify the harness is snug, with no slack, and the chest clip is at armpit level. Check the recline angle matches the manufacturer’s instructions and the seat belt or LATCH system is tightly secured. Confirm all straps and buckles are correctly positioned. A final tug on the seat ensures stability. These checks guarantee your child’s safety, providing peace of mind during travel. Always refer to the Safety First car seat manual for specific guidance tailored to your model.
11.2. Importance of Following Manufacturer Guidelines
Adhering to the manufacturer’s guidelines for your Safety First car seat is critical for ensuring your child’s safety. These instructions are designed to meet strict safety standards and address specific features of your car seat model. Deviating from the guidelines can lead to improper installation, increasing the risk of injury. Always check the manual for details on recline angles, harness tightness, and expiry dates. Proper installation, as per the guide, minimizes hazards and ensures your child is protected in the event of a crash. Following these steps is essential for maximizing safety and reliability.
11.3. Long-Term Safety Considerations
Long-term safety for a Safety First car seat requires regular inspections and maintenance. Check for wear, tear, or damage, and ensure the seat remains securely installed. Expired car seats must be replaced, as indicated by the manufacturer’s guidelines. Store the seat properly when not in use to avoid damage. Cleaning according to instructions prevents degradation of materials. Always follow the manufacturer’s recommendations for lifespan and usage to ensure ongoing protection for your child. Regular checks and adherence to guidelines help maintain the car seat’s effectiveness over time, providing consistent safety for your child.